


The most requested photograph parents ask me to make is a portrait of their child with a soft, blurry background. People sometimes describe wanting a photo with the subject “popping” out of the image. These photographs have a small area of sharp focus, with the rest of the frame having a soft-yet-pleasing dreamy quality.
In photography speak, these photos have what’s called a narrow depth of field. Depth of field pertains to the depth of the focus in relation to the focal point. Images with a wide depth of field have a lot of the frame in focus. In contrast, images with a narrow depth of field have only a small portion of the image near the focal point in focus. The rest of the image will be blurry or out of focus. While this will not look good if you want to photograph an expansive mountain range or a large group of people, narrow depth of field images tend to flatter individual faces, with the eyes in sharp focus and the rest of the face appearing ‘soft’ thus minimizing pores, blemishes, etc. Additionally, with the majority of the image out of focus, the eye is immediately drawn to the part of the image that is in focus, here, your beautiful child. While a narrow depth of field is often associated with expensive camera lenses, you may be surprised to learn you don’t need high-end gear to attain this look.


One of the neat, albeit occasionally frustrating, aspects of photography is that there are a number of ways to accomplish the same goal, and a narrow depth of field is no different. Instead of getting overwhelmed by this flexibility, use it to your advantage! If you don’t have the equipment to accomplish the look one way, simply try another, and, experiment with different methods to see which one suits you best.
There are three ways to create a photograph with a narrow depth of field using a camera.
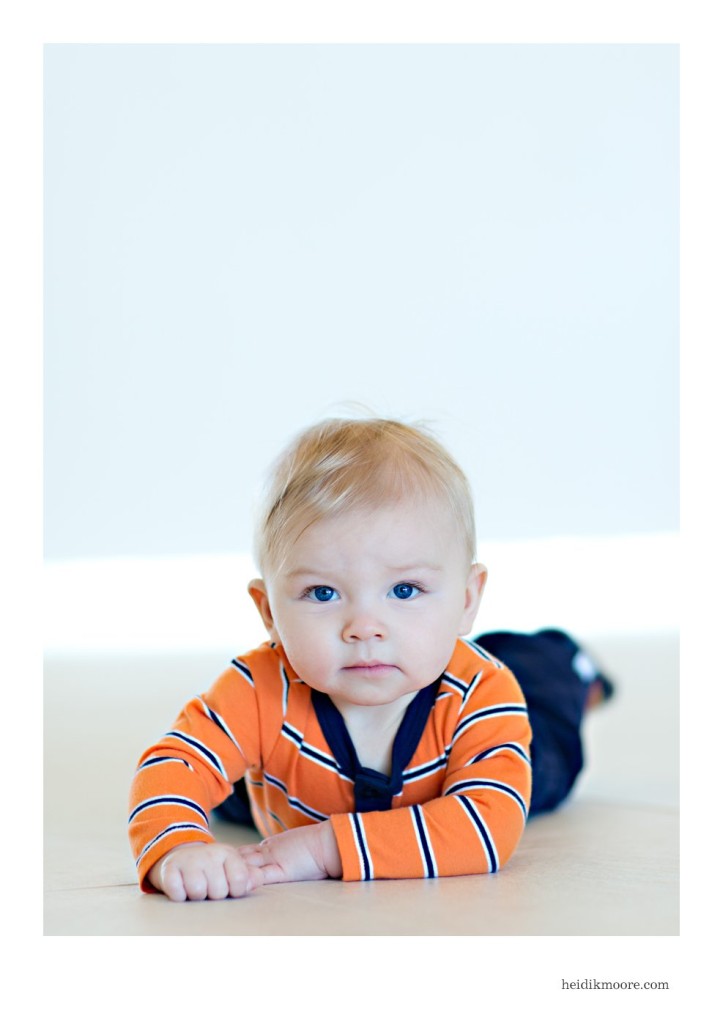
- Use a lens with a low aperture. Also known as ‘f stop,’ aperture controls the size of the shutter opening. A smaller number creates a larger opening and that creates a narrower depth of field. For a portrait of one child, an aperture of 2.8 or lower will create a nice, narrow depth of field. However, beware that as aperture decreases, so does the size of your focal point, so you’ll need to be spot on with your focus when using lower aperture values. For those with DSLR cameras, entry-level prime (aka fixed focal length) lenses are a reasonable option.

[I used an aperture of f/2.2 to make his dark eyes stand out.]
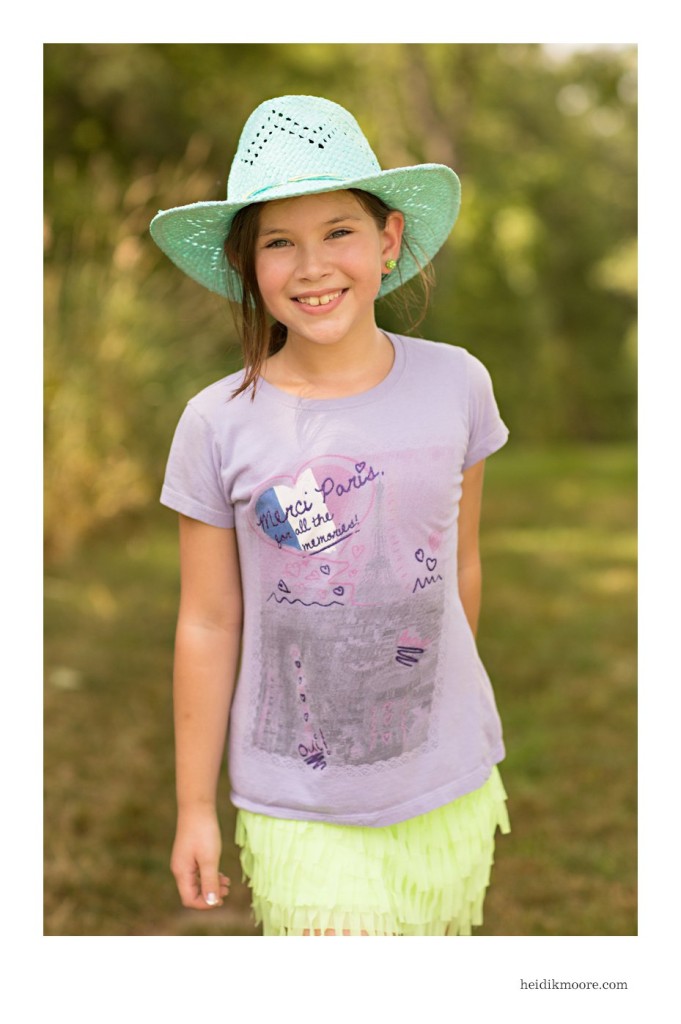
- Use a lens with a longer focal length. Expressed in millimeters, the focal length of a lens tells you how much it can magnify a subject. A lens with a longer focal length, sometimes called a telephoto lens, will allow you to photograph subjects further away by ‘bringing’ objects closer to you (optically). For portraits, the result is a compression of the background that renders it soft and out of focus. So that lens you purchased for your cross-country travels? Put it on your camera and try using it for portraits. You will need to be farther away from your kids, so make sure they are safe or have a volunteer/older sibling help you. Lenses with focal lengths of 85mm and above are good options.
[Here, I used an 85mm lens to create pleasing ‘negative space’ at the top of the image.]
- Put lots of separation between subject and background. So you don’t have a DSLR camera or the ability to change lenses? Here’s your option. Instead of putting your subjects right up against the background, have a lot of separation between the two. How much will depend on the aperture of the lens you are using, with higher apertures needing more separation. Using this technique, the far away background will fall outside of the plane of focus and, therefore, will be soft and blurry.
[I had this girl stand far ahead of tall grass to keep her the focus of the image.]
You also can use computer software to blur the background of a photo, although I suggest using this sparingly and only if you absolutely
must. Most photo-editing software includes filters that you can apply to blur parts of the image. One such filter is called Gaussian blur. If you choose this option, go lightly to avoid the blur appearing too artificial and don’t forget to remove the effect from the subject.
I hope you have fun experimenting with these techniques to create soft, dreamy portraits of your little ones. You can combine the camera-related techniques to create a more pronounced effect, such as a longer lens with ample background separation. I would love to see the results of your practice, as well as hear your suggestions for future photography-related articles.
*Heidi is a local, professional photographer. Check her out at Heidi K Moore Photography and on Facebook.


Great tips Heidi!