


My grandma was a great seamstress who taught my mom how to sew. Every year in September my mom and I would start thinking of Halloween costume ideas and figure out how we could make them. It was so much fun spending that time with my mom picking out fabric, cutting, sewing, etc. Although I did not inherit the sewing ability – I am pretty good with a hot glue gun, and thus I was able to carry on the tradition of the home-made Halloween costume. Having four children, I do start thinking about Halloween in August, brainstorming ideas with them. They look through all the Halloween catalogs that come in the mail, pick an idea, and then we get to work designing and creating.


Throughout the years there have been some really good costumes and some that were really hard, or that I was not too proud of, but in the end, all that really matters is that it was fun for me and the kids, and who am I kidding, we all got treats!
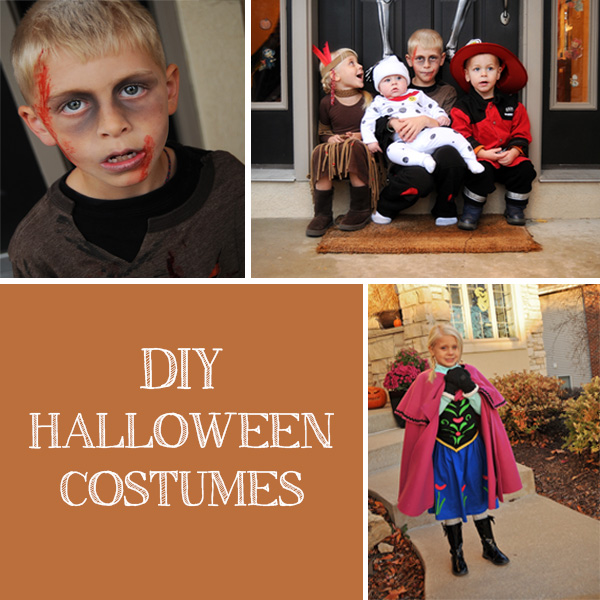
I would like to share with you some ideas for home-made costumes, materials used, and how I created them. The best part is that all of these costumes cost between $10-$30!!


#1 Charlie Brown – My baby was bald, what better costume? I found a yellow T-Shirt (Goodwill), and used black fabric marker (JoAnn Fabrics) to draw and color the zigzag, I used shorts/socks/shoes that we already had!
#2 Dalmation Puppy
– (went with the fireman costume of his big bro) – Purchased a white long sleeve onesie and white leggings (Target), used black fabric marker (JoAnn Fabrics) to color in the spots, purchased red and gold felt (JoAnn Fabrics) to make the collar and tag. I used Heat N Bond (JoAnn Fabrics) to attach the felt to the onesie. I purchased the white hat at the Dollar Store (they are great for hats and mittens) and used black felt for the ears. The ears I ended up gluing onto the hat with fabric glue.
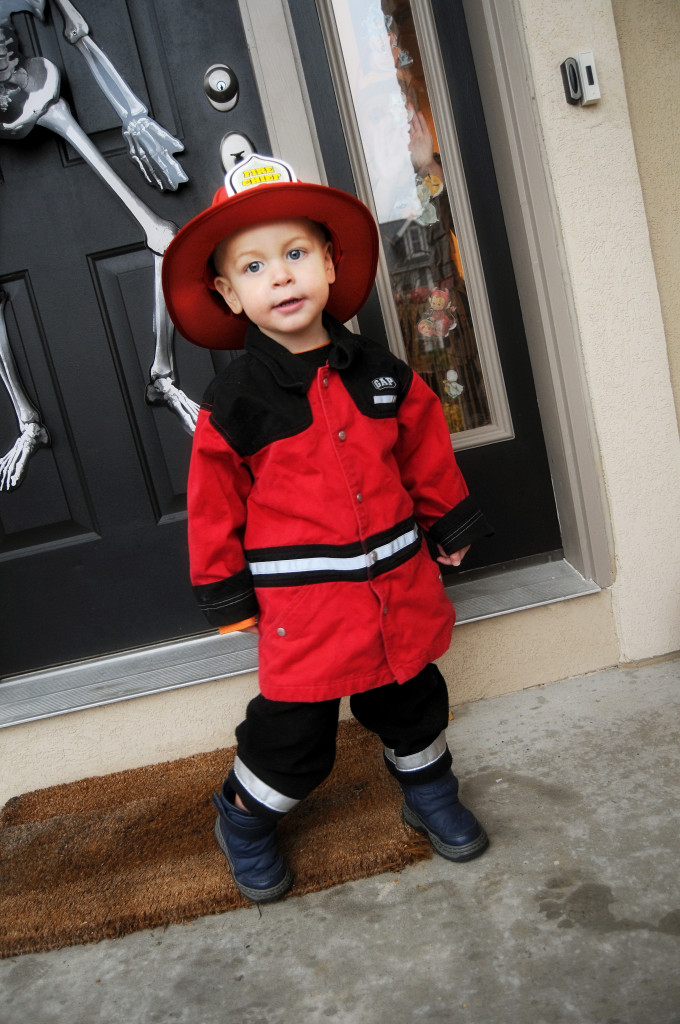
#3 Fireman – This one was pretty easy, as we had gotten the fireman coat as a hand-me-down. You could also find coats like this at second hand stores or ask your friends, I bet one of your friends has some kind of a fireman coat! I purchased black sweatpants at Goodwill and put reflective tape around the bottom of them. He wore his snow boots, and the hat we purchased at Target in the dollar section, but most fire departments have plastic hats to give to kids, so you could also ask your local station if they have any they would be willing to give you. This is a great costume if it happens to be cold for Halloween trick-or-treating, as you can layer on a lot underneath it 🙂
#4 Spider – By far one of the cutest, but it took me awhile to make this one. I used old black socks from my husband (he saves everything) and stuffed them with stuffing/fluff that you can purchase at JoAnn Fabrics or any Craft store. I bought a black sweatshirt and pants from Goodwill. We used fishing wire and black duct tape to attach the “legs” to his arms. The black hat was purchased at the Dollar Store (I told you they were good for hats) and the eyes were purchased at JoAnn Fabrics and glued onto the hat with fabric glue.
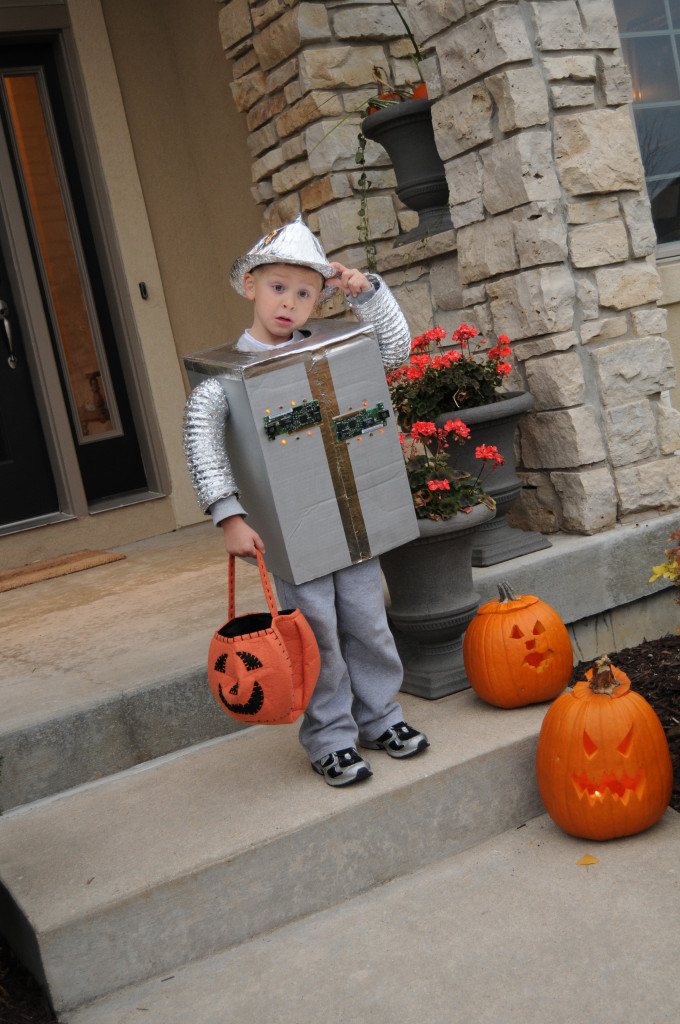
#5 Robot – My husband actually got into this one! He made spray painted the box metallic silver and placed circuit lights (battery operated) into the box so that he was blinking. We used a Dryer Hose we purchased at Home Depot for the arms, and covered a tupperware bowl with tin foil for the hat. He kind of looked like the tin man with the hat, so if I did this costume for one of his brothers, I would do another box for the head. Gray sweats he already owned completed the look!
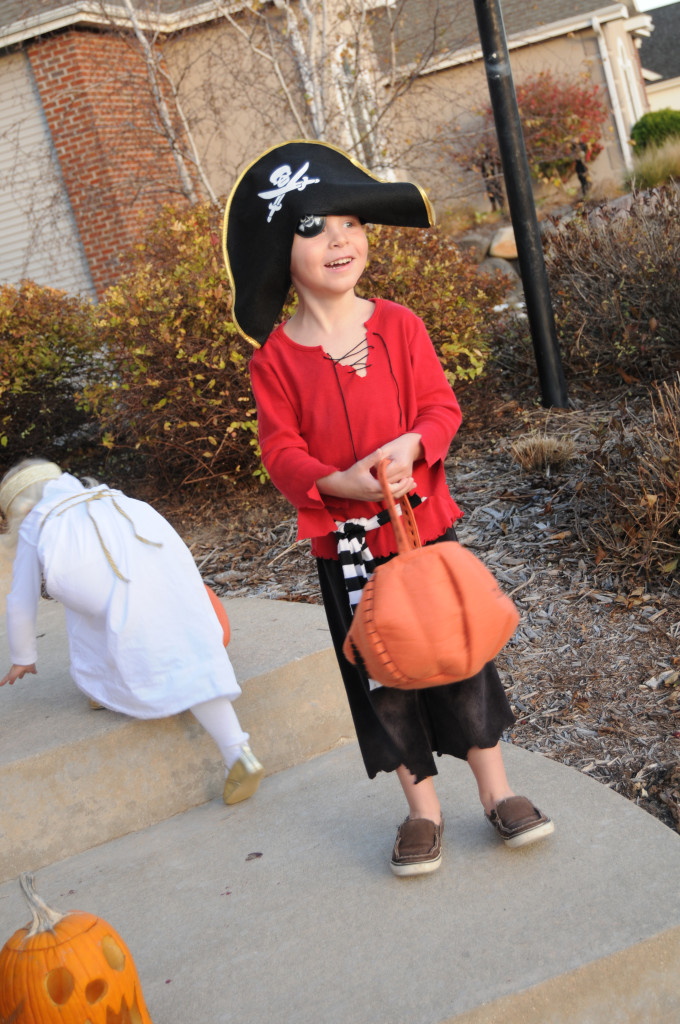
#6 Pirate – This entire outfit minus the hat came from St. Vinny’s! I bought black pants, a red shirt and a black/white striped scarf. I cut the bottoms of the pants and the arms of the shirt ragged and jagged. I used a hold punch to punch some holes in the shirt and old shoelace to lace it up. The hat we had from a dress-up bin we had at home, and the eye patch from The Dollar Store in a bag of party goody’s.
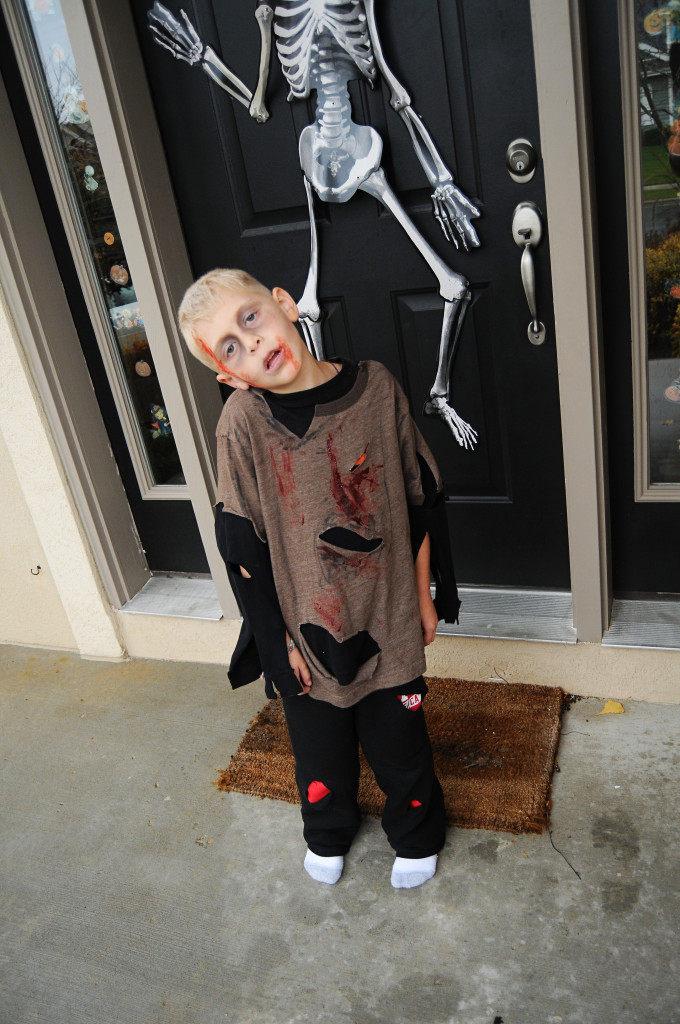
#7 Zombie – As my oldest son got older he of course wanted to be scarier, and thus I thought my days of fun making with him were over. But instead they got better, not only did I get to make the costume, but now also got to do make-up and pretend blood! The zombie costume itself was super easy, I purchased clothes at Goodwill and ripped them, cut them, and rolled them around in mud and dirt. The fun part with this costume was the make-up. I used an extra light foundation and powder on his face for the pale look. I mixed gray/dark blue/and dark brown eyeshadow to create the bags under his eyes and the sunken and hollow cheek bones. Then there was the blood, the best part! I mixed some chocolate syrup with red food coloring and the color and the consistency were perfect for dripping on his shirt and face.
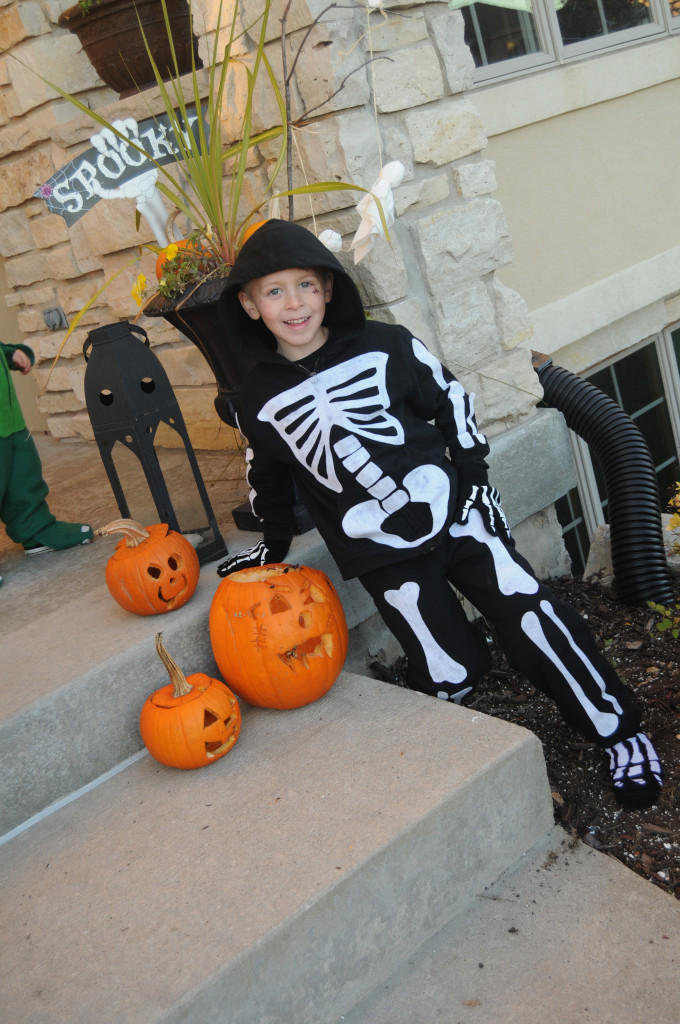
#8 Skeleton – This costume was by far the most time consuming! It took me while to draw all the bones and cut them out. I know I could have found a bone pattern online, but I actually could not find what I was looking for, and I am rather picky 🙂 So instead I used a skeleton decoration we hang on our front door and traced his bones as my pattern. I then traced them onto white felt, cut everything out, and placed them on a black sweatsuit. To finish the look, I found skeleton gloves at Walmart, and skeleton socks at Party City. The socks I bought in a larger size and he wore them over his shoes.

#1 Grecian Goddess – I wish I could do this one over again, but she was only 2 and won’t even remember 🙂 I took an old white sheet and wrapped it around her toga style! I purchased gold rope at JoAnn Fabrics and also wrapped it around her in a crisscross pattern. I found some really pretty gold headbands to use on her head, and I spray painted some old shoes gold.
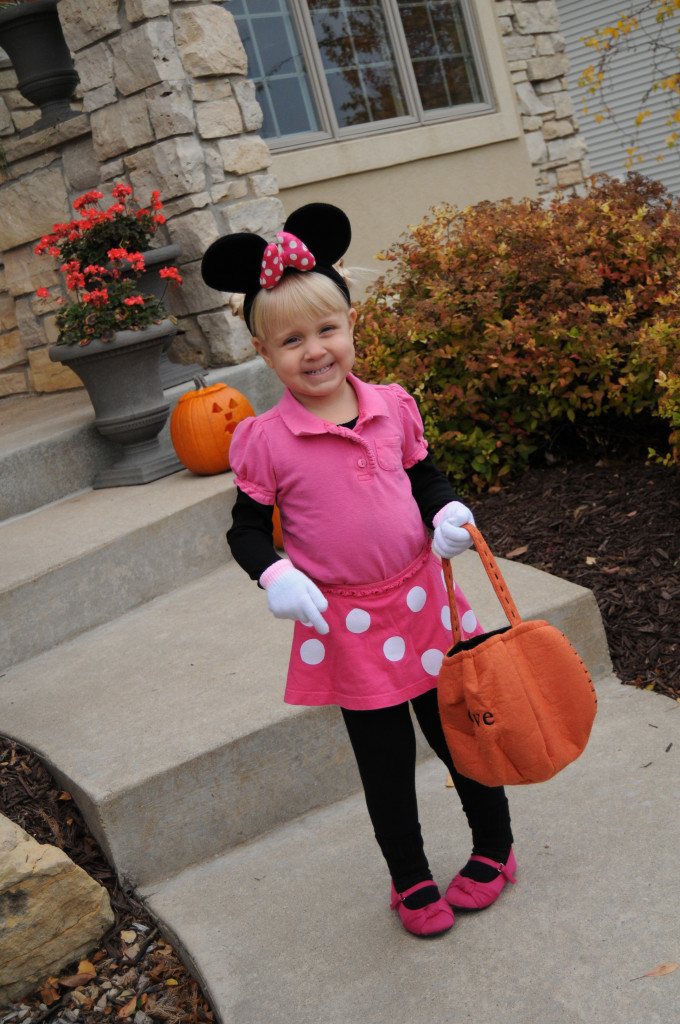
#2 Minnie Mouse – Of course we had the ears, so the rest of the costume just fell into place. A black long sleeved shirt and black leggings she already had. I purchased the pink polo and pink skirt from Goodwill. The added the polka dots to the skirt using white felt and Heat N Bond.
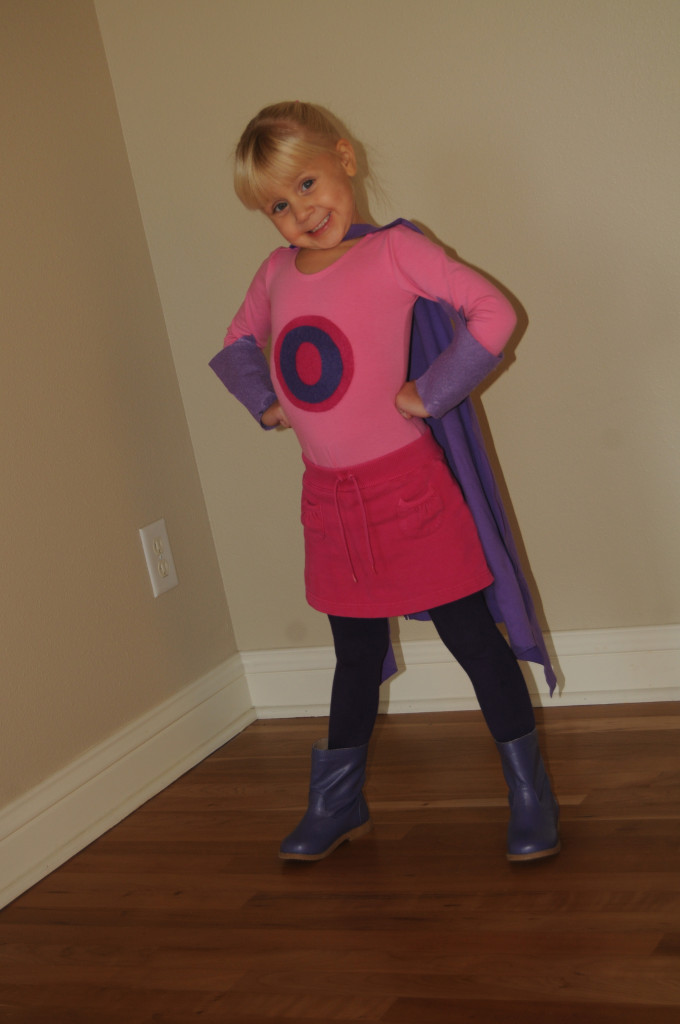
#3 Super Hero – I purchased the pick long sleeved leotard on Etsy (www.etsy.com) The pink skirt, purple boots, and purple tights she already had. (I always try to use what we have) I used felt to make the ‘O’ for ‘Super Olive’ and for the arm cuffs. The arm cuffs close with velro. (Velcro can be purchased at any craft store. I used the self-adhesive velcro, no sewing involved) The cape is a piece of purple fabric remnant I found at the Fabric Store with a hold cut for her head. I could have also used velcro to attach the cape rather than around her neck, but I ran out of velcro. Lesson learned – you can never have too much velcro!
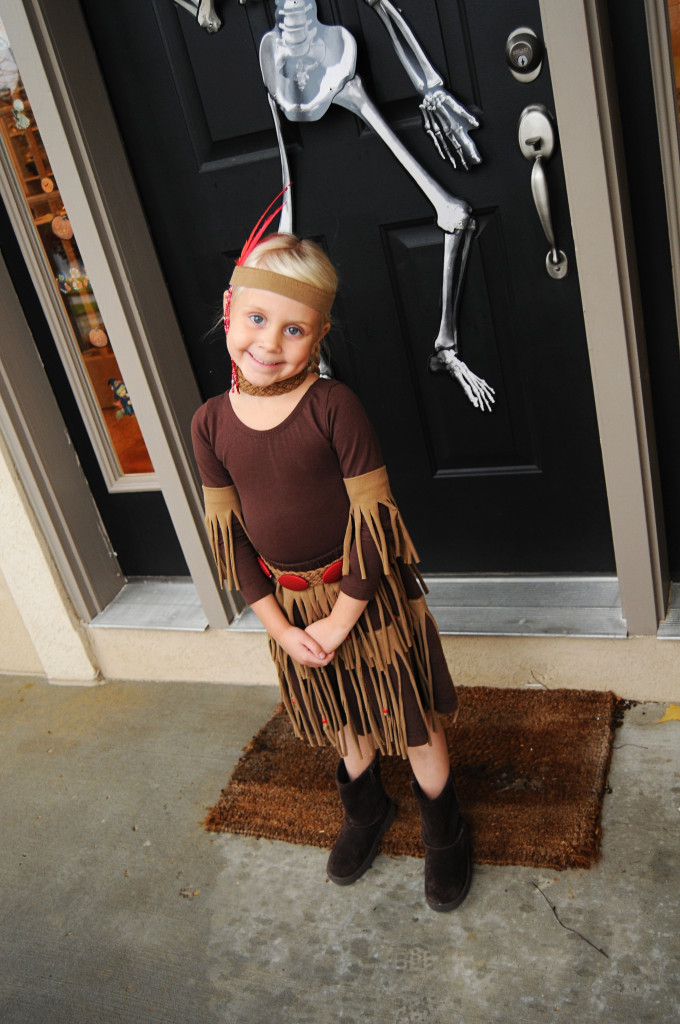
#4 Princess Tigerlily from Peter Pan – I purchased a brown long sleeve leotard from the same Etsy shop as for the super hero costume! I could not find a brown skirt at Goodwill, so I bought a brown adult Tshirt, cut across the shirt under the armpits and sewed some elastic to make a skirt. I also bought a tan adult Tshirt which I cut into strips and then into fringe. I glued the fringe strips onto the skirt with fabric glue, and the fringe on the arms are attached around the arms with velcro. (I wanted to be able to use the leotard separate) I then bought some red beads and the craft store and glued them onto the skirt. I made a choker and headband out of the leftover Tshirt material and added beads and feathers. She wore her brown winter boots.
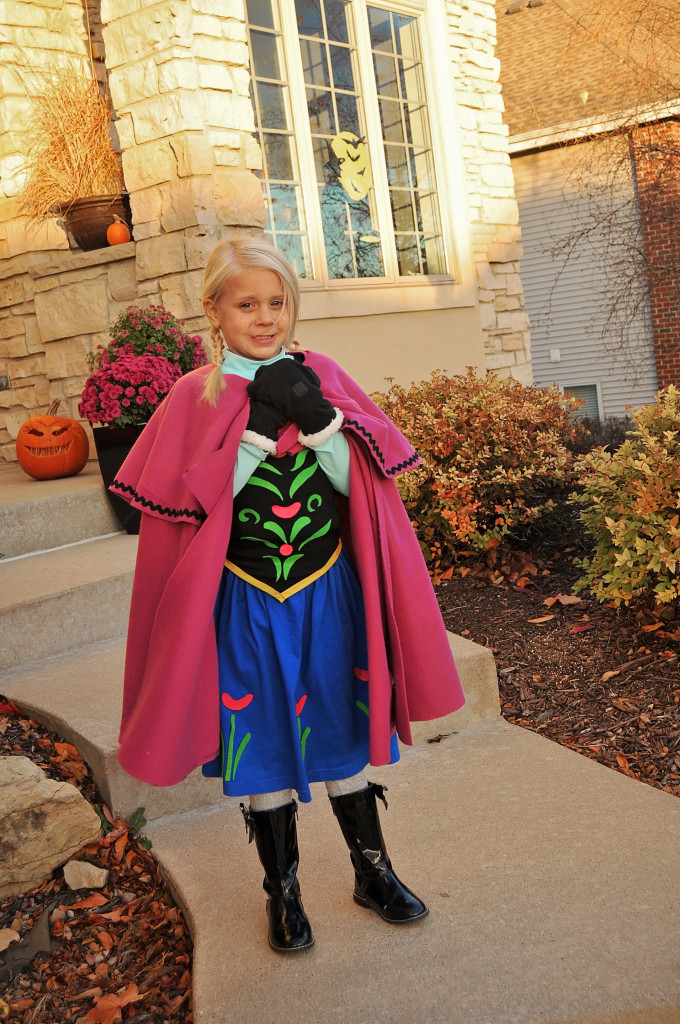
#5 Who wasn’t Elsa or Anna last year right?! I totally thought she would choose Elsa, so I was all prepared to make the blue gown, then she through me for a loop when she wanted to be Anna. Good thing though, because it was cold last year, and the Anna cape was nice and warm. Besides the skeleton costume, this was the most difficult. I wanted it to be perfect! The long sleeve blue shirt was a swim shirt from Lands End on clearance 🙂 I bought a black tank top from Walmart and cut the top to look more like a corset top. I finished the bottom hem with gold trim. The blue skirt was made out of an oversized Tshirt from Goodwill. All of the flowers and leaves were hand drawn and cut out of felt. I then meticulously glued each one on the fabric glue. I found the black mitten at Walmart. The black boots she already had. The cape I am in love with! She even wore it for other things that winter. I bought 2 yards of fushia polar fleece from JoAnn Fabrics. I laid it out on the floor and used a hula hoop as my template for a circle. I then laid out the rest of the material and cut a smaller circle (to be the smaller piece that lays on top of the longer piece) I measured my daughters neck and shoulders, then I placed the two circle on top of each other and cut a circle in the middle to be the neck/head hole. I then cut out the opening for the front, by cutting a slit from the neck hole to the edge of the circles. I found a cape closure at the craft store and stitched it to the cape, so that it latched shut and stayed together. Finally I added black rick rack around the edge of the smaller top piece. And of course to finish the look, we had to do the braids and added some freckles with my eyeliner.
This year she has decided to go a little darker with her costume, and I will soon be making Maleficent horns, staff, and a long dark robe. Although to be honest I am most excited about the purple and green eyeshadow and false lashes she wants to wear! 🙂
I will also be making Professor Dumbledore, Darth Vadar, and a Mummy this year!
What will your children be this year? Feel free to share your ideas and pictures too!
Happy Halloween!


Wow!!! These are amazing!!!! I am not sure if I could pull these off!
These are awesome! Great tips and ideas! I also make our entire family costumes last year was pirates my daughter asked for Daddy to be Jack Sparrow. This year is entire family Frozen. I used clothes we owed for most of them and just add emblishments.